Twitter

Online

Tuesday, December 11, 2012

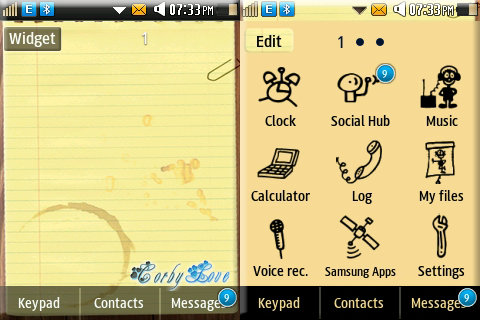
Sketch Note Theme For Samsung corby 2


CORBY 2 THEMES: Sketch Note Theme by Anonymous 
Sketch Notes lets you jot down ideas, sketch ideas or note down anything else you would with your paper notebook. A nice grid background helps sketching accurately and to scale. Works especially well with a traditional stylus and resistive touchscreen tablets, as well as with your finger on capacitive screen tablets and phones.
 

Apple theme for Corby 2

 
 corby-2-themes-stained-theme

Download and install - Update Galaxy S3 with Official Jellybean 4.1.2 XXELKC Firmware

S3 Logo 
Procedure to Update Galaxy S2 GT I9100 with the Latest Jellybean 4.1.2
  • Download the Latest Jellybean 4.1.2 Firmware Package and Odin from here to your computer. Once downloaded, connect your device to the computer with the help of original USB cable and place the zip file in your Galaxy S3’s external SD Card.
  • Once you have placed the zip file, disconnect the device and turn Off your phone so that it can be then entered in the Download Mode.
  • The download mode in Galaxy S3 GT I9300 can be entered in recovery mode by pressing the Volume Up rocker key + power button at the same time while the device is turned Off. If the device starts in the normal mode, you need to re try the process of the entering the device into the download mode.
  • Open Odin in your computer and connect your Galaxy S3 while it’s in the download mode with the computer and then you will see that after a minute the ID : COM section will turn Yellow indicating that all the drivers are successfully installed.
Note: If ID : COM section doesn’t turn Yellow, you need to check with two things which are mentioned below,
        Install the USB Drivers in your computer &
        Go to the Path “Settings > Wireless & Network > USB Settings” and ensure that “Samsung KIES” option is ticked before connecting the phone to the computer.
  • Click on “PDA” to select “” the tar file and then select the option of “Start” for starting the process of firmware update. As soon as the update is applied successfully, you will see that the device will be rebooted.
  • Please note that it may take more than 5 -6 minutes for applying the update and to reboot since it has to finalize all the app data etc. Once the device shows up the home screen, navigate to “Settings > About Phone” the current firmware version will be mentioned as Jellybean 4.1.2.
Note: If the device gets into the boot loop sequence or say gets stuck in the welcome screen, just re insert the battery and re follow the above instructions so as to again follow the above mentioned instructions.
So, there you go, you have now successfully updated your device with the latest Jellybean XXELKC Firmware which ropes in the latest Jellybean 4.1.2 firmware.

Download and install - Update Galaxy S GT I9000 with Jellybean 4.1.2 Codename Android Firmware

Codename Android 
Procedure to update Galaxy S I9000 with Codename Android 4.1.2 Firmware:
  • Download the Google Apps Package and Codename Android 4.1.2 Firmware from here to your computer. Once downloaded, connect your device to the computer and place these two zip files in your internal SD Card. Ensure that you are not placing the file deep into the sub folders.
  • Disconnect the device and turn off your phone so that it can be entered in the recovery mode.
  • Recovery mode in Galaxy S GT I9000 can be entered by holding the Volume Up button + the Home key button (the middle button). While holding these both buttons, turn ON your device.
  • In recovery mode, select “Wipe data/factory reset” & “Wipe Cache partition”. If the device starts normally, then you will need to re try the process of entering the device in the recovery mode. You can also enter the device in recovery mode via the ROM Manager app.
  • Now, in the recovery mode, select “install zip from sd card” > “choose zip from internal sd card” and then choose the Codename Android Custom ROM Firmware and Google Apps Package. It will take around 4 -5 minutes for applying the update.
  • Once you see the “install from sd card complete” message on screen, select “Go Back” and select “reboot system now” for rebooting the device in the normal mode. To check whether the firmware is updated or not, head over to the path “Settings > About Phone” where you will find the current firmware version.
Note: just in a rare case if the device doesn’t boot up or show the home screen then remove the battery and reinsert the same to boot the device again in the normal mode.

Root Samsung Galaxy Y S5360


Galaxy Y Logo 
Guide to Root Samsung Galaxy Y S5360 Android Phone:
  • Download the Rooting Package from here to your computer. Once downloaded, connect your phone to the computer with the help of original USB cable and then place the Rooting Package in your device’s external sd card.
  • Disconnect the device from computer and turn off your phone so that it can be entered in the recovery mode.
  • The recovery mode can be entered by pressing  Volume UP Key + OK button, and holding both simultaneously press the Power Button. Now, in recovery mode, select “Wipe data/factory reset” & “Wipe Cache partition” so that all the cache data will be cleared.
  • Now, select “install zip from sd card” and then select the rooting package file which you have placed in your device and press the power button to confirm the same. Once the file is selected, you need to just follow the on screen instructions for rooting the device. Please note that the whole process will take around 3 -4 minutes and may take longer time in some cases.
  • To check on whether your device is rooted or not, you will have to download the “Root Checker” app from the Google PLAY Store. If your Galaxy Y is not rooted, then you need to re follow the instructions mentioned above.
Do share with us in the comments section just in case if you come across any issues in the process of this update as we will try our level best to address the same.

Download and install - Update Galaxy Y S5360 with ICS Styled USSR V8 Stable Custom ROM Firmware

Galaxy Y Logo 
USSR 1 USSR 2 USSR 3 USSR 4 USSR 5 USSR 6 
Guide to Update Galaxy Y S5360 with ICS Looking Custom ROM Firmware:
  • Download USSR V8 Firmware package from here to your computer. Once downloaded, connect your device to the computer with the help of original USB cable and then place the zip file in your device.
  • Once placed, disconnect the phone and turn off your phone so that it can be entered in the recovery mode. Alternatively, you can also enter your Galaxy Y into recovery mode with the help of ROM Manager app which can be downloaded from Google PLAY Store.
  • In recovery mode, select “Wipe data/factory reset” & “Wipe Cache partition”. If the device starts normally, then you will need to re try the process of entering the device in the recovery mode.
  • Recovery mode can in Galaxy Y can be entered by pressing  Volume UP Key + OK button, and holding both simultaneously press the Power Button. Now, in recovery mode, select “Wipe data/factory reset” & “Wipe Cache partition” so that all the cache data will be cleared.
  • Now, select “install zip from sd card” and choose the USSR V8 Firmware package zip which you have placed in your phone. It will take around 3 -4 minutes for applying the update.
  • Once the firmware is updated successfully, you will get to see the message “install from sd card complete” and then select “go back” with the help of volume rocker keys and select “reboot system now” for rebooting the device ion the normal mode.
Tip: If your Galaxy Y S5360 doesn’t power up or say it gets into the boot loop mode, you need to re insert the battery and then re try the process of firmware update by following the above steps.
  • To check on whether your device has updated with this firmware or not, head over to “Settings > About Phone” then you will get to see the current firmware version as USSR V8 2.3.6 Firmware.
Do let us know in the comments section just in case if you face any issues as we will try our level best to sort out the same.

Tuesday, December 4, 2012

Download and install - Update Samsung Galaxy S3 I9300 Omega v33.2 Jellybean 4.1.2 Custom Firmware

Galaxy S2 Pink logo 
Procedure to update Galaxy S3 GT I9300 with Omega v 33.2 Custom ROM firmware:
  • Download the Omega v 33.2 Custom ROM Firmware Package from here to your computer. Once downloaded, connect your phone to the computer and place the zip file in your external sd card and not in your phone memory.
  • Disconnect the device from computer and turn off your Galaxy S3 so that it can be entered in the recovery mode. Recovery mode in Galaxy S3 GT I9300 can be entered by holding the Volume Up button + the Home key button (the middle button). While holding these both buttons, turn ON your device.
  • In recovery mode, select “Wipe data/factory reset” & “Wipe Cache partition”. If the device starts normally, then you will need to re try the process of entering the device in the recovery mode. You can also enter the device in recovery mode via the ROM Manager app.
  • Select “install zip from sd card” > “choose zip from internal sd card” and then choose the Omega Custom ROM Firmware which you have placed in your phone. It will take around 4 -5 minutes for applying the update.
  • Once the update is applied, select the option of “Go Back” and “Reboot System now” for rebooting the device in the normal mode. Since it’s a first reboot, it will take more time than the normal mode as it has to finalize all the apps etc.
Note: If the device gets into the boot loop sequence or say gets stuck in the welcome screen, just re insert the battery and re follow the above instructions so as to again follow the above mentioned instructions.
Do share with us in the comments section just in case if you face any issues as we will try our level best to sort out the same. So there you go you have now successfully learnt on how you can upgrade your Galaxy S3 with the Omegas v33.2 custom ROM Firmware.

Twitter Delicious Facebook Digg Stumbleupon Favorites More

 
Design by Free WordPress Themes | Bloggerized by Lasantha - Premium Blogger Themes | belt buckles
Design Downloaded from Free Blogger Templates | Free Website Templates